


The goal of this article is to show you how to set up a simple test and deliver it in 10 minutes! Web logs of the web servers give you the possibility to perform the traffic analysis over time, but how can you estimate how much traffic your infrastructure can handle?
To find out, you need a tool that can push your infrastructure and its application stack to the breaking point. One of the available tools is the free Web Capacity Analysis Tool (WCAT). You can download it from the following websites:
x86: http://iis.net/downloads/1466/ItemPermaLink.ashx
x64: http://iis.net/downloads/1467/ItemPermaLink.ashx
It is a pretty lightweight load-generation tool that creates scripted HTTP requests against your Web servers and at the same time, you can gather performance data. You can choose either HTTP 1.0 or HTTP 1.1 requests, with or without SSL. If you require, you can also use NTLM authentication and if your site uses cookies, form, or session-based authentication, you can create the correct GET or POST request to authenticate the test user.
What is pretty nice, is that WCAT is multithreaded. In practice it means that you can run tests with multiple load-test clients that are controlled from only one source, simulating thousands of concurrent users. Is this something that we can learn easily? Yes! WCAT engine uses a simple script to be played back to the webserver. Extensibility is provided through plug-in DLLs and a standard, simple API.
End of theory! Time for a test!
To perform the simple test you need the following:
1. Web server with a simple website (can be even the IIS default).
2. Any machine that simulates a client to send out HTTP requests – can be a regular Windows client.
Our test will consist of a couple of simple steps:
1. Install WCAT on the test machine (I assume this is already done, right?)
2. Initialize the WCAT controller
3. Prepare the script file for WCAT and start the test
4. Analyze the results
After you have installed WCAT on the test machine, it is time to prepare everything for the test. Even though WCAT configuration is relatively simple, it is necessary to set up a couple of settings, like how many clients you want to run, frequency of HTTP requests, test time, etc. You can set up all these parameters in 3 WCAT configuration files: script file, configuration file, and distribution file. Script file defines the client and server transactions, so simple instructions performed by WCAT clients (instances) that define the content requests that the clients will send to the server during the test. The configuration file defines how many clients will be used during the tests and what settings will be applied to them. The last one is a distribution file, and is used for clients and controller to distribute the test time to selected transactions. In this file, we use weights that define the percentage of the test period during which each transaction is performed. We will do it a bit easier, as we will use one file with all these settings!
The file is available here: http://stderr.pl/tools/UHT/scenario.txt
Review the settings and we are ready! Now let’s start a test.
Make sure that your web server is responding to requests. On the attacking machine, where WCAT is installed, perform the following steps:
1. Copy the scenario.txt file to the installation folder of WCAT.
2. Launch cmd.exe. Change the working directory to where WCAT is placed.
3. In cmd.exe set default path for cscript: cscript //H: Cscript, optionally you can always put cscript in front of each wcat command.
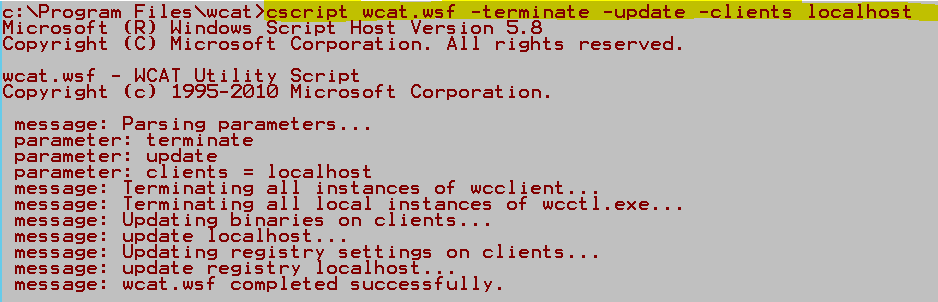
4. Install wcat client – type: cscript wcat.wsf -terminate -update -clients localhost.
5. Launch wcat – in the following way: cscript wcat.wsf -run -s <hereyouputyourserverIPorname> -v 1 -t scenario.txt
a. For example: cscript wcat.wsf -run -s 10.10.10.10 -v 1 -t scenario.txt

b. If you think that generated traffic is too low you can increase the value specified after –v parameter to 10.
6. Do not close the command prompt window. It allows you to easily re-launch wcat utility.

In the meantime, you can observe how the tested server reacts from the CPU perspective.
After the test, you will find the summary log in the folder where you placed WCAT. Try to play with parameters to generate a load that will be noticeable for the server. Works as a good server workout, right? 🙂
The next episode will be about “Exporting the not-exportable – a technique for grabbing from certificate its private key that has been made not exportable.”
Stay safe!
CQURE Experts