Antivirus software usually uses malware signatures, behavioral detection or heuristic detection to block malware. All these methods may be insufficient in case of APT (Advanced Persistent Threat) attacks prepared specifically for the victim or attacks exploiting 0day vulnerabilities in software, that were never seen before. Exploit Guard: Exploit Protection and Exploit Guard: Attack Surface Reduction (ASR) are security features available natively in Windows. Both may be used to support Antivirus software in blocking APT / 0day attacks by implementing additional mitigations. Exploit Protection may be used with third-party Antivirus software, while Attack Surface Reduction (ASR) rules work only with Windows Defender Antivirus enabled.
In this article, we will explain the main functionality of Exploit Protection and ASR rules and its’ internals.
Exploit Protection is a successor of EMET (Enhanced Mitigation Experience Toolkit). It was introduced in Windows 10 (starting with version 1709) and Windows Server 2016 (starting with version 1803). It allows to enable attack mitigations, including Data Execution Prevention (DEP) or Structured Exception Handler Overwrite Protection (SEHOP), which in case of existing buffer overflow vulnerability in the application may stop the attacker from exploiting it or at least make the exploitation much more difficult. Exploit Protection also allows to block chosen applications from creating child processes or executing Win32k system calls and other.
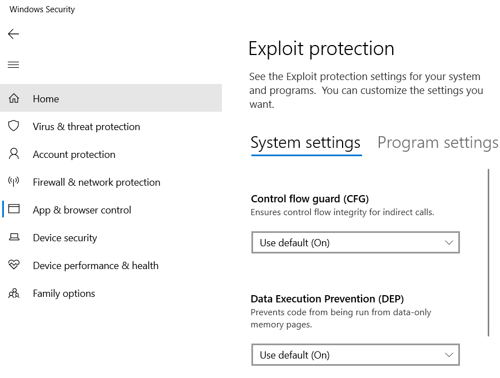
For example, let’s say that there is a 0day buffer overflow vulnerability in Foxit PDF reader allowing the attacker to inject malicious code via prepared PDF files sent to victims – after opening the PDF file the attacker may gain control over the machine of the victim.
If the security features in Exploit Protection were enabled, there would be a much higher chance that malicious code wouldn’t run even if the vulnerability existed in Foxit Reader.
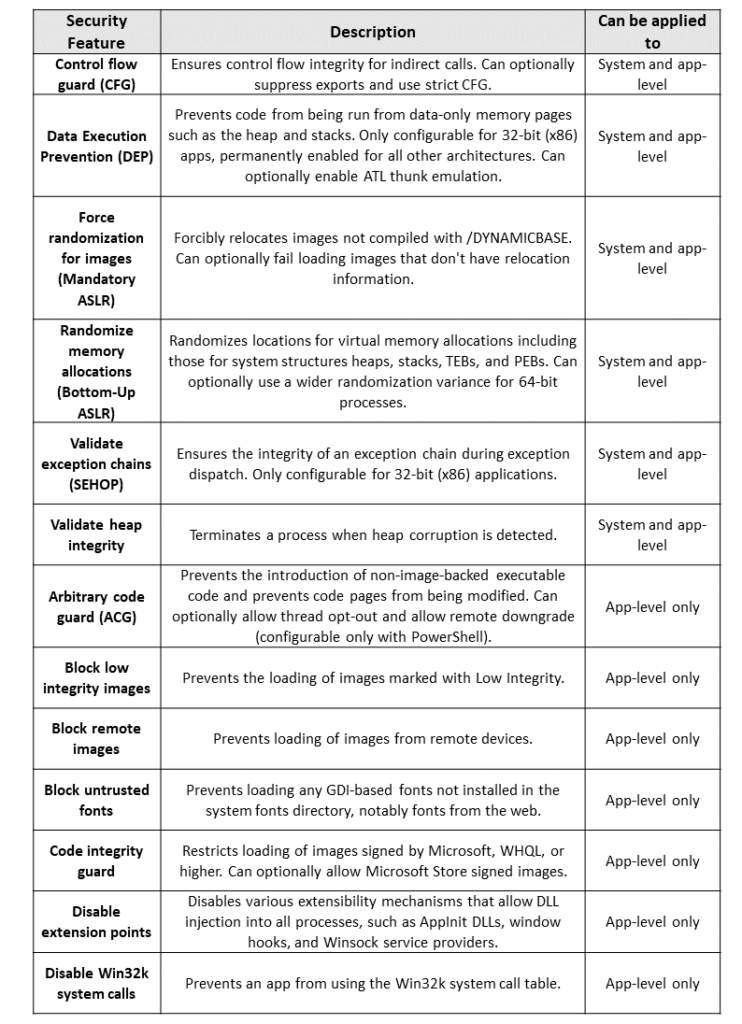
Exploit Protection introduces security features that may be used to minimize the risk of successful attack, they can be applied to the system or only on application level.
The whole list of available options is provided below:
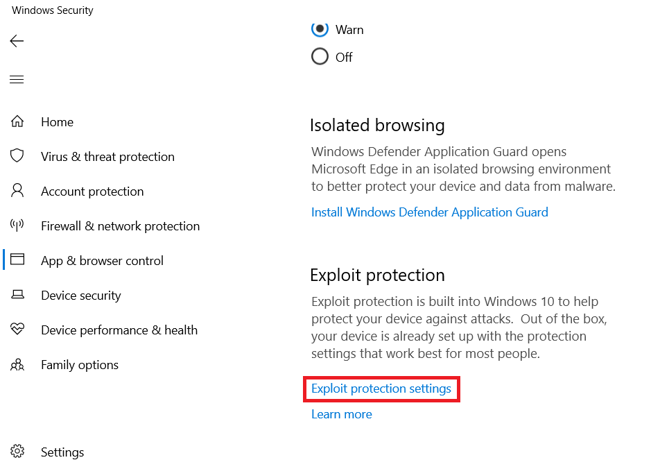
Exploit Protection may be set manually in Windows Security, it may also be configured with Group Policy or PowerShell.
To setup Exploit protection manually open Windows Security – App & browser control – Exploit Protection settings:
To enable a mitigation (in this case DEP) on system level with PowerShell, you can use the following command:
Set-ProcessMitigation -System -Enable DEP
To enable mitigation (in this case SEHOP) on app-level use:
Set-ProcessMitigation -Name c:\app\app.exe -Enable SEHOP
To check which Mitigation Options are set for the running process, you can use the following command:
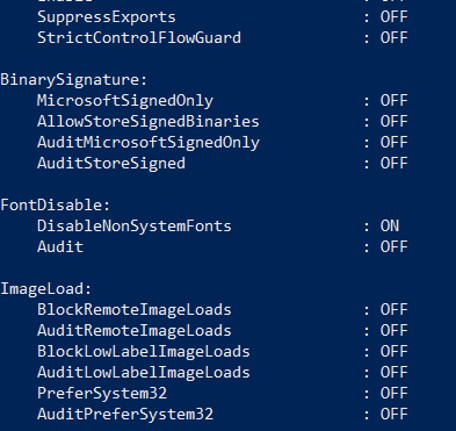
Get-ProcessMitigation -Name app.exe -RunningProcess
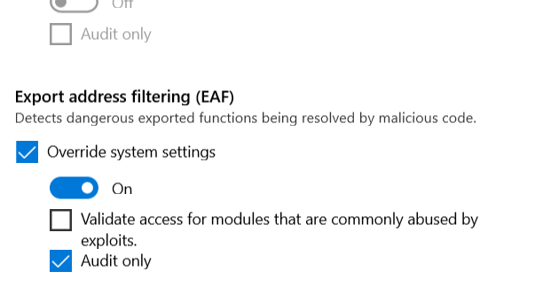
You can setup some of the mitigations in Audit only mode e.g. to check if the mitigations are not causing problems in normal operation of the program before enabling the mitigation.
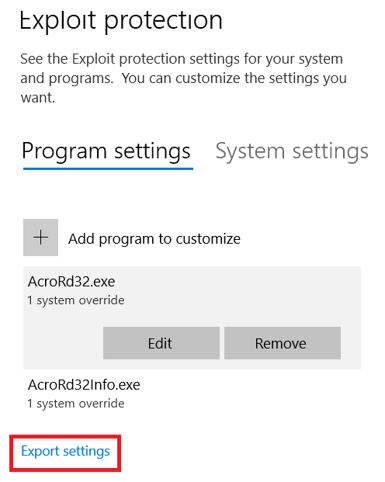
You can export XML config file from GUI:
Or you can export the same config file with PowerShell:
Get-ProcessMitigation -RegistryConfigFilePath settings.xml
The config file may be imported with PowerShell or it may be distributed with the use of Group Policy.
Importing the config file with PowerShell:
Set-ProcessMitigation -file settings.xml
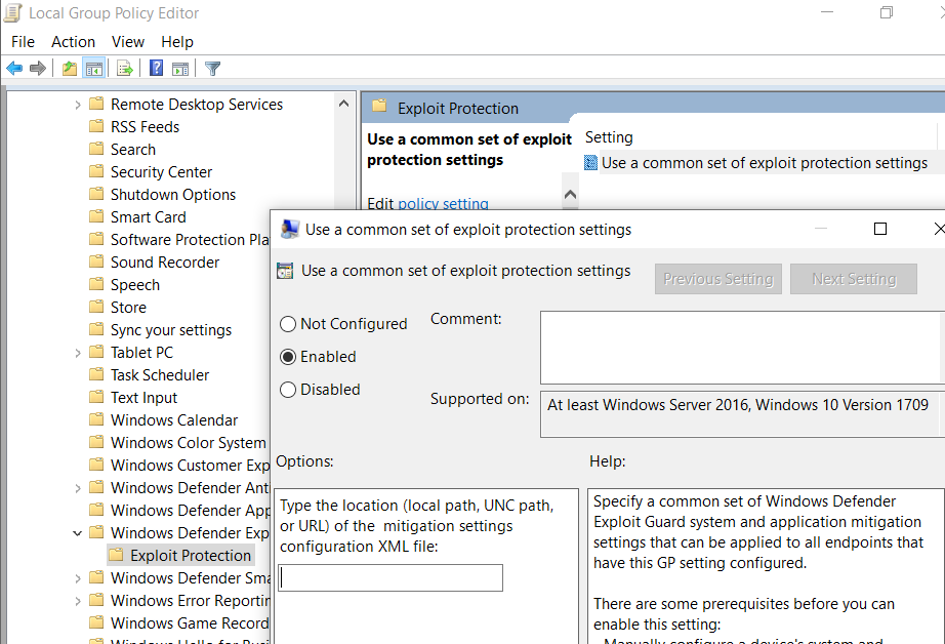
In case of Group Policy – settings should be changed to point to the XML file in Windows Components > Windows Defender Exploit Guard > Exploit protection
More information about setting up Exploit protection: https://docs.microsoft.com/en-us/windows/security/threat-protection/microsoft-defender-atp/customize-exploit-protection
Exploit Protection logs are stored in Event Log, they can be viewed with Even Viewer under Application and Service Logs -> Microsoft -> Windows -> Security-Mitigations:
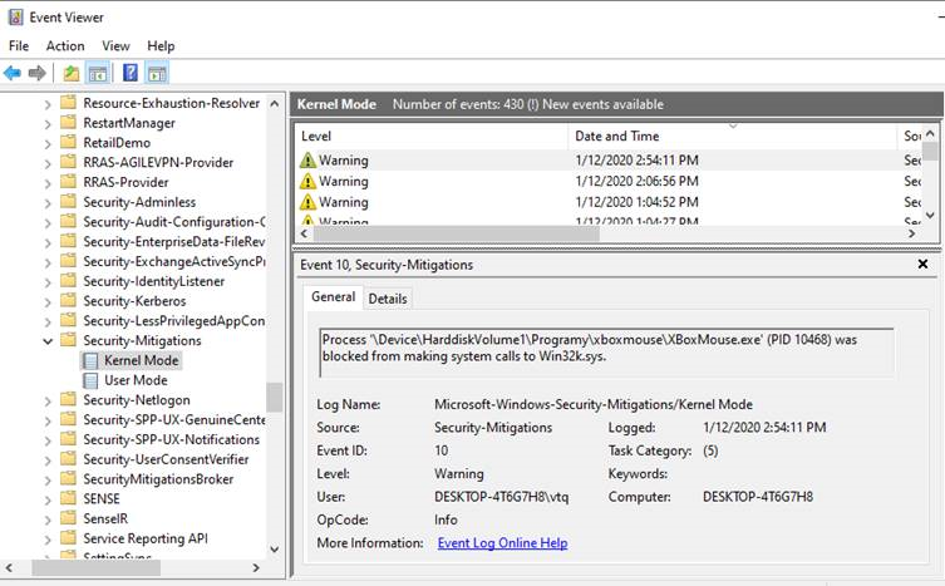
Detailed logs documentation: https://github.com/palantir/exploitguard/blob/master/README.md
The predecessor of Exploit Protection – EMET (Enhanced Mitigation Experience Toolkit) was using Shim to implement security enhancements for the process. Shim is a library that transparently intercepts API calls and changes the arguments passed, handles the operation itself or redirects the operation elsewhere. Shims are mainly used to simulate the behavior of older versions of Windows for legacy applications that rely on incorrect or deprecated functionality, or correct the way in which poorly written applications call unchanged APIs. (Application Compatibility feature built in Windows). Mitigations implementation in EMET with Shim:
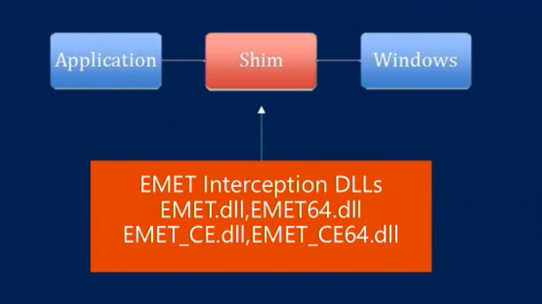
The Exploit Protection goes further – instead of using Shim mechanism, the security mitigations are built in the Windows system. The configuration of Exploit Protection is saved in the Windows Registry as following:
The System (system-level) settings are saved in MitigationOptions registry entry in:
HKLM\System\CurrentControlSet\Control\Session Manager\kernel
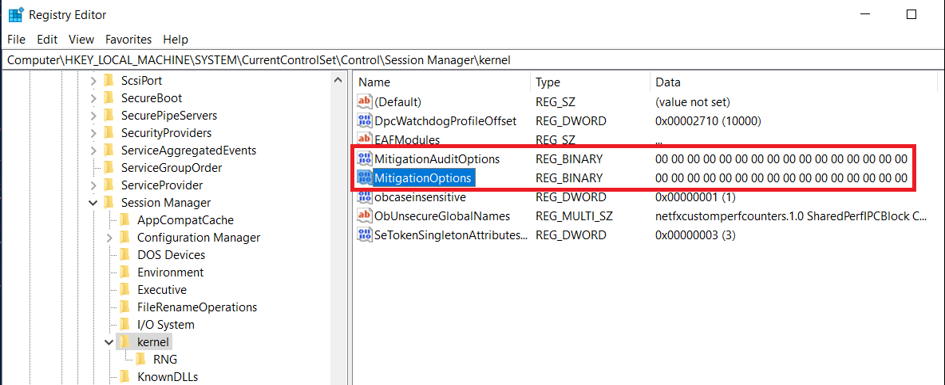
The Program (app-level) settings are saved in MitigationOptions registry entry in
HKLM\Software\Microsoft\Windows NT\CurrentVersion\Image File Execution Options\<appname>

The description of the flags corresponding to configured mitigations is provided below:

0 = Default/Do Nothing
1 = On
2 = Off
When the system creates a process, it asks the Windows registry if there are any mitigation settings set for it. ProcMon output of starting process is provided below:

After checking the flags in registry, the flags are set in _EPROCESS in the following structures (https://www.vergiliusproject.com/kernels/x64/Windows%2010%20|%202016/1909%2019H2%20(November%202019%20Update)/_EPROCESS )
ULONG MitigationFlags;                                              //0x850
struct
{
ULONG ControlFlowGuardEnabled:1;                                //0x850
ULONG ControlFlowGuardExportSuppressionEnabled:1;               //0x850
ULONG ControlFlowGuardStrict:1;                                 //0x850
ULONG DisallowStrippedImages:1;                                 //0x850
ULONG ForceRelocateImages:1;                                    //0x850
ULONG HighEntropyASLREnabled:1;                                 //0x850
ULONG StackRandomizationDisabled:1;                             //0x850
ULONG ExtensionPointDisable:1;                                  //0x850
ULONG DisableDynamicCode:1;                                     //0x850
ULONG DisableDynamicCodeAllowOptOut:1;                          //0x850
ULONG DisableDynamicCodeAllowRemoteDowngrade:1;                 //0x850
ULONG AuditDisableDynamicCode:1;                                //0x850
ULONG DisallowWin32kSystemCalls:1;                              //0x850
ULONG AuditDisallowWin32kSystemCalls:1;                         //0x850
ULONG EnableFilteredWin32kAPIs:1;                               //0x850
ULONG AuditFilteredWin32kAPIs:1;                                //0x850
ULONG DisableNonSystemFonts:1;                                  //0x850
ULONG AuditNonSystemFontLoading:1;                              //0x850
ULONG PreferSystem32Images:1;                                   //0x850
ULONG ProhibitRemoteImageMap:1;                                 //0x850
ULONG AuditProhibitRemoteImageMap:1;                            //0x850
ULONG ProhibitLowILImageMap:1;                                  //0x850
ULONG AuditProhibitLowILImageMap:1;                             //0x850
ULONG SignatureMitigationOptIn:1;                               //0x850
ULONG AuditBlockNonMicrosoftBinaries:1;                         //0x850
ULONG AuditBlockNonMicrosoftBinariesAllowStore:1;               //0x850
ULONG LoaderIntegrityContinuityEnabled:1;                       //0x850
ULONG AuditLoaderIntegrityContinuity:1;                         //0x850
ULONG EnableModuleTamperingProtection:1;                        //0x850
ULONG EnableModuleTamperingProtectionNoInherit:1;               //0x850
ULONG RestrictIndirectBranchPrediction:1;                       //0x850
ULONG IsolateSecurityDomain:1;                                  //0x850
} MitigationFlagsValues;                                            //0x850
};
union
{
ULONG MitigationFlags2;                                             //0x854
struct
{
ULONG EnableExportAddressFilter:1;                              //0x854
ULONG AuditExportAddressFilter:1;                               //0x854
ULONG EnableExportAddressFilterPlus:1;                          //0x854
ULONG AuditExportAddressFilterPlus:1;                           //0x854
ULONG EnableRopStackPivot:1;                                    //0x854
ULONG AuditRopStackPivot:1;                                     //0x854
ULONG EnableRopCallerCheck:1;                                   //0x854
ULONG AuditRopCallerCheck:1;                                    //0x854
ULONG EnableRopSimExec:1;                                       //0x854
ULONG AuditRopSimExec:1;                                        //0x854
ULONG EnableImportAddressFilter:1;                              //0x854
ULONG AuditImportAddressFilter:1;                               //0x854
ULONG DisablePageCombine:1;                                     //0x854
ULONG SpeculativeStoreBypassDisable:1;                          //0x854
ULONG CetUserShadowStacks:1;                                    //0x854
} MitigationFlags2Values;                                           //0x854};
MitigationFlags corresponds to the system’s mitigation measures, and the corresponding flag bit can be set to take effect.
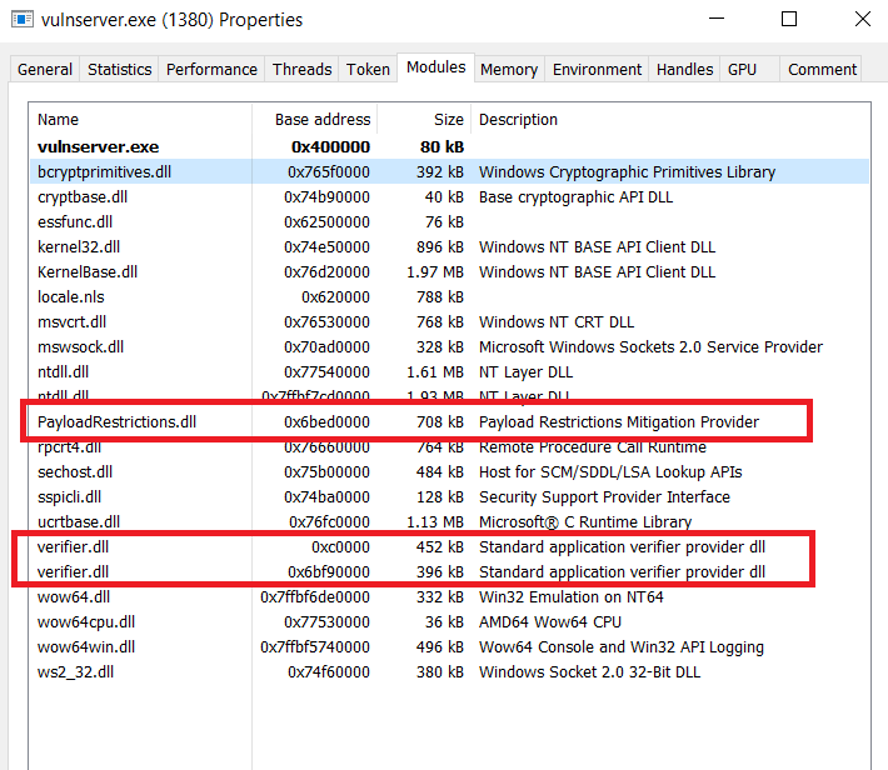
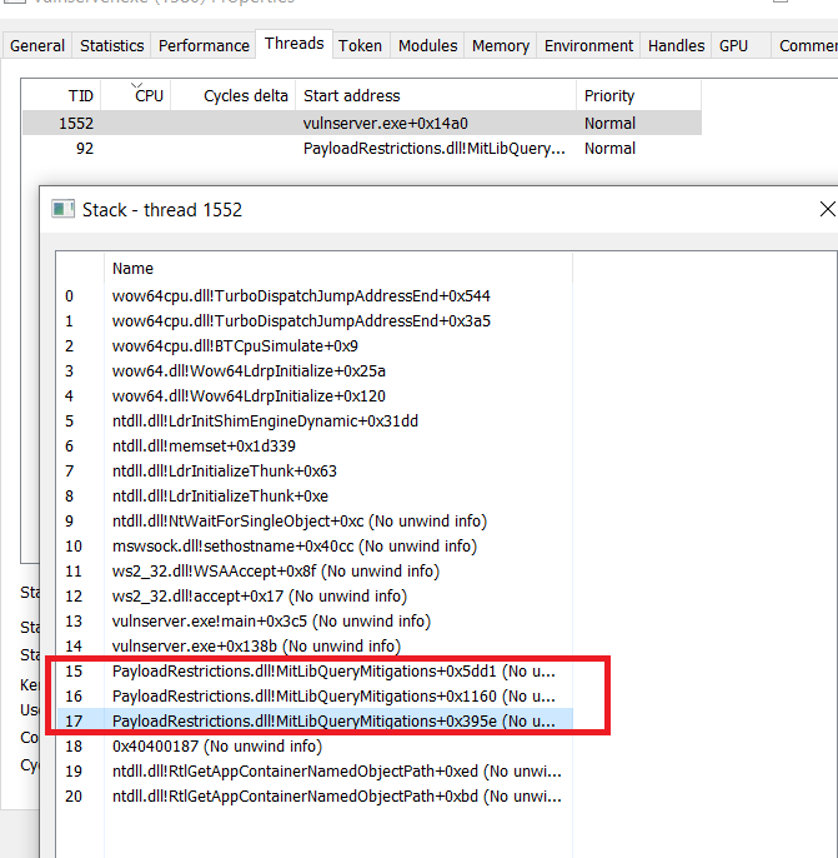
MitigationFlags2 corresponds to enhanced mitigation measures and needs to be loaded by the dynamic library PayloadRestrictions.dll which is loaded into a process via the verifier.dll.
As an example, let’s enable ‘Block untrusted fonts’ mitigation (from MitigationFlags structure)
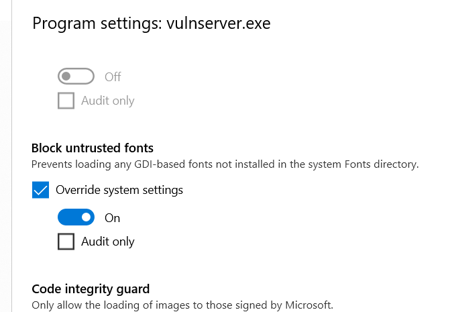
No external libraries are being used – the mitigation is implemented in the system itself.
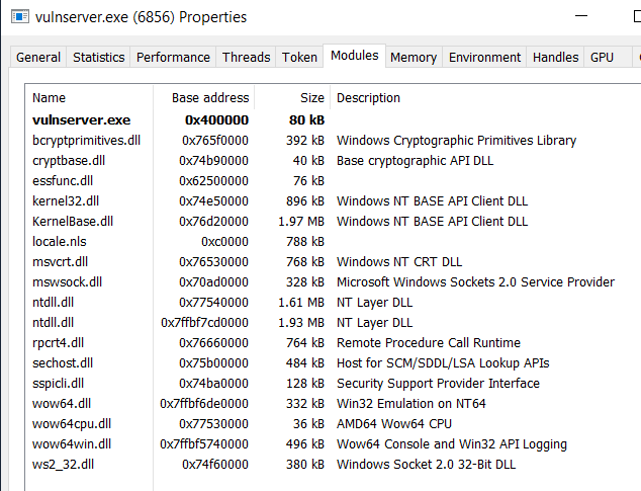
However, when we enable Import Address Filtering (IAF) from MitigationFlags2 structure:
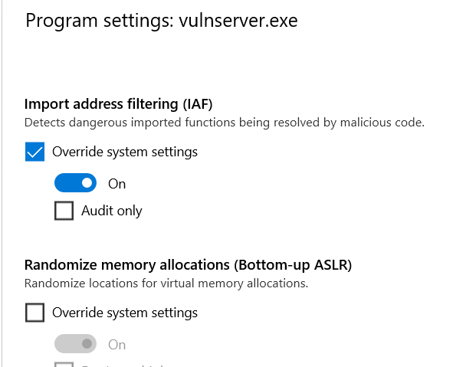
In this case additional external libraries verifier.dll and PayloadRestrictions.dll are being loaded:
Attack Surface Reduction (ASR) rules offers similar approach – it allows to use more specific predefined rules to block some of the most common attack vectors, such as blocking child processes in all Microsoft Office applications or Adobe Reader. For example, if the Word file with a macro that runs malicious PowerShell script is opened by the user and if it tries to spawn powershell.exe child process – ASR rules will block it. Exploit Protection may be used with third-party Antivirus software, while Attack Surface Reduction (ASR) rules work only with Windows Defender Antivirus.
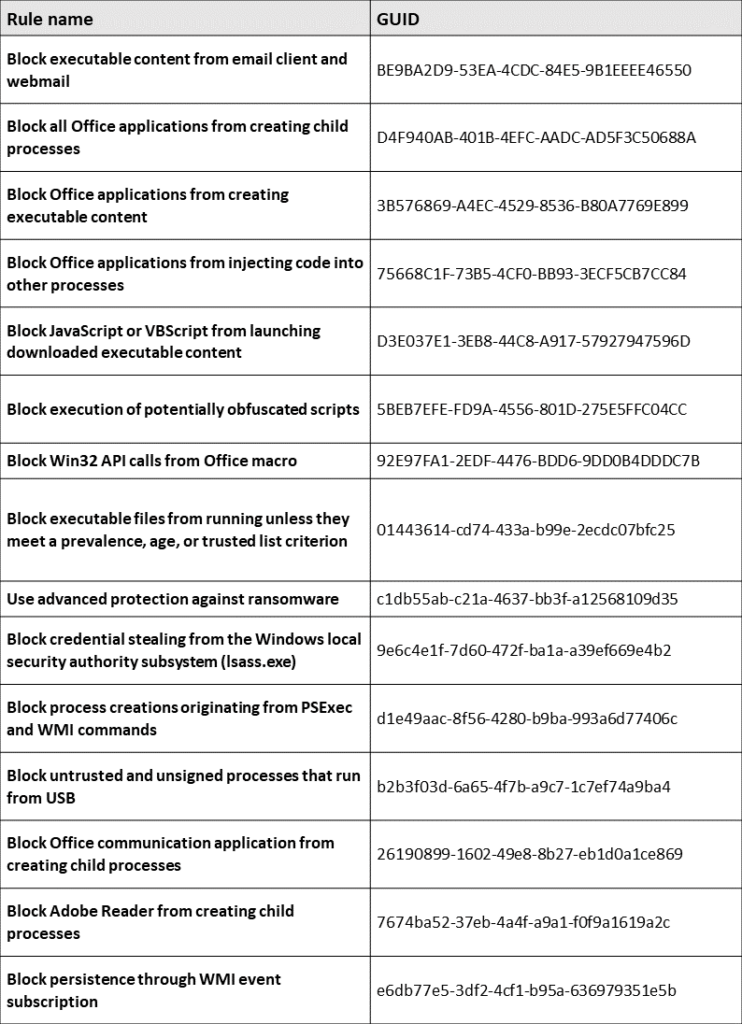
List of available rules with GUIDs needed in configuration is presented below:
ASR rules may be enabled with Group Policy or PowerShell.
Group Policy setting is available in:
Computer Configuration -> Administrative Templates –> Windows Components –> Windows Defender Antivirus -> Windows Defender Exploit Guard –> Attack Surface Reduction Rules
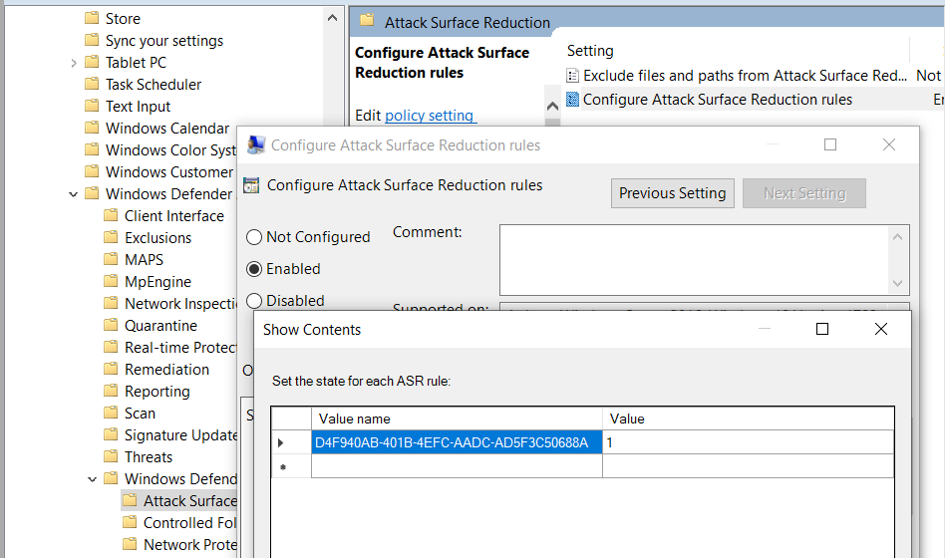
PowerShell command to enable the rule with “D4F940AB-401B-4EFC-AADC-AD5F3C50688A” GUID:
Set-MpPreference -AttackSurfaceReductionRules_Ids D4F940AB-401B-4EFC-AADC-AD5F3C50688A -AttackSurfaceReductionRules_Actions Enabled
Disabling the rule:
Set-MpPreference -AttackSurfaceReductionRules_Ids D4F940AB-401B-4EFC-AADC-AD5F3C50688A -AttackSurfaceReductionRules_Actions Disabled
Enabling the security features may result in unstable operation of the applications or the system. Before enabling the mitigations on production environment it is recommended to test it first or run it in audit only mode if possible.
To sum up, Exploit Guard features allow administrators to mitigate the threats to the software running on the machines in the corporate network that may not be recognized by Antivirus software. As always – it is a cat-and-mouse game between the attackers and the defenders – there are some methods to bypass security features available in Exploit Protection such as ASLR, DEP, also some methods to bypass ASR rules were identified in the past. But to bypass these features the attacker must be more skilled and put more effort to execute a successful attack or some additional conditions must be met. That’s why it is still a good idea to use them to minimize this risk.
Do you know what else can be used to cheat cybersecurity setup and compromise your system? Take 2-hours training from CQURE CyberBytes series and be aware of the risk.
References:

Artur Wojtkowski, CQURE’s Cybersecurity Expert and Trainer with wide professional experience gained in many industries, mainly in telecommunication, banking and insurance sector. Specialized in infrastructure, web, mobile application penetration testing and social engineering. Member of (ISC)2 Poland Chapter. Holder of CISSP, OSCP, OSCE certificates.


Do you want to receive the geekiest cybersecurity solutions, tools, and tricks, straight to your inbox?
Learn more about our offer in terms of Consulting. Our Cybersecurity Experts perform consulting work on a daily basis, hence we are fully prepared for any challenge.
Learn more about our offer in terms of Consulting. Our Cybersecurity Experts perform consulting work on a daily basis, hence we are fully prepared for any challenge.
Lorem ipsum dolor sit amet, consectetur adipiscing elit. Ut elit tellus, luctus nec ullamcorper mattis, pulvinar dapibus leo.