The acronym UAC stands for User Account Control, a part of the system which is present in every version of Windows since Vista. No matter if you’re a security expert, administrator, or just a regular user – you have seen UAC prompt at some point.

It was introduced to the Windows world to address a specific issue: people tend to work using administrative accounts with serious system rights. Without UAC, any action performed using an administrative account could have destructive results. Accidental removal or modification of system files, modification of security settings (disabled AV protection), accessing data of other users for malicious purposes – those are some examples of unintended (or maliciously intended) actions.
To prevent them, Microsoft introduced a concept known as User Account Control – when enabled even an administrative account doesn’t have those dangerous privileges – they have to be explicitly requested. Requesting them typically requires just clicking on the “Yes” button, but even though it sounds easy to emulate with scripting, it really isn’t. If configured properly, UAC displays its prompt on a special desktop, named “Winlogon” (aka Secure Desktop). Only the most privileged users (Local System) within the system have access to it. While sitting in front of your computer, you can interact with its windows, but the same cannot happen in a remote session or through a script. The secure desktop shouldn’t be confused with virtual desktops, added in Windows 10. They are completely unrelated.
In Windows, every process or thread has assigned token. This token includes several interesting information, but this article, we should focus on the integrity level and associated privileges. Typically (but not always), the thread inherits token from its process, and the process inherits the token from the user who owns the process (but not always, again). You can inspect the process token in several ways, eg., by checking properties of a process in Process Explorer and going to the Security tab.
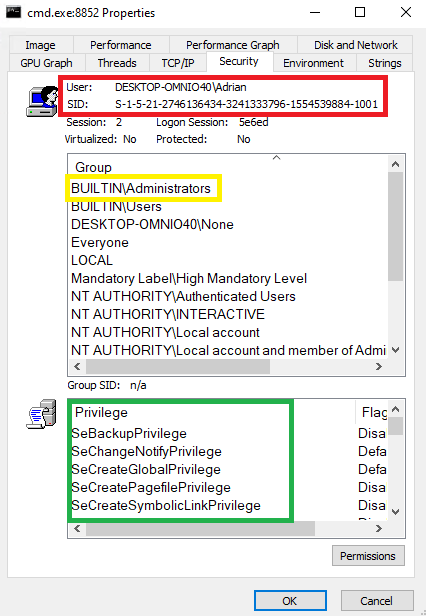
In the red box, we can see the owner of the token, while in the green box, we can see associated privileges. It doesn’t matter, whether they are Disabled or Enabled – the important thing is that they are present on the list, thus they can be enabled if needed. The yellow box highlights the fact that this user is a member of the Administrators group. Also, what’s not seen on this screenshot, is that the process is running in the so-called High integrity mode. We can assume that anything running in High (or System) integrity level, has administrative rights.
Such token could have been created because someone used the “Run As Administrator” option from the context menu on the cmd.exe application. Compare it with the token of a process run by the same user, but executed just by double-clicking on the icon.
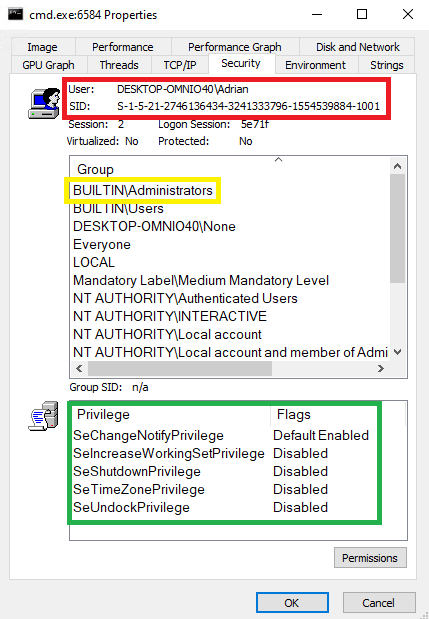
The token owner is the same user that belongs to the same groups, but there are only a few associated privileges. This token is called a filtered token, and it is used to run an application as if it was run by a standard user, without any administrative rights. The token cannot be used to perform destructive actions. The missing privileges cannot be easily added to the token. This is exactly what UAC promised. Also, the process runs in Medium integrity.
There is more than one method to authorize the application and grant it administrative rights. This is also known as application elevation. There is an Over-The-Shoulder (OTS) method, which any user can initialize, and it is expected that the administrator will just physically type required credentials. The application will then be started using the provided credentials. A different prompt appears when the user already is an administrator but uses a filtered token. This is called Admin Approval Mode (AAM). In such a case, the user is expected to simply click on the right button (“YES”), thus agreeing to elevate the given application.
If you want to get more information about UAC – full documentation of this solution can be found in MSDN documentation or Windows Internals book.
Imagine such a situation: you are performing a penetration test, and you have managed to get remote code execution on the target system. In your shell (webshell or reverse shell), you have discovered that your process is running on an administrative account, but in a standard user context. You can display various token privileges using the whoami command.
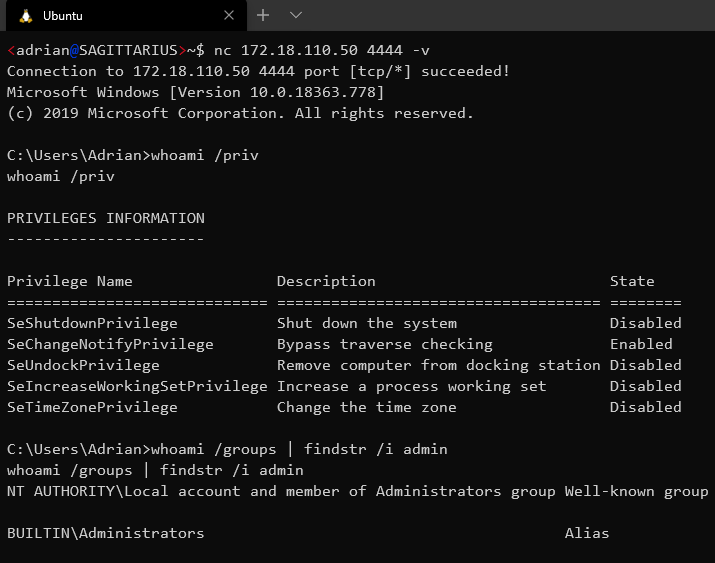
The filtered token has only a few privileges associated
The user belongs to BUILTIN\Administrators – that’s a good sign. However, any privileged command will result in Access Denied, unless we find a way to elevate the token to High integrity. Again, if you simply run the command that results in the UAC prompt, you won’t be able to see that prompt and interact with it. This is why the bypass method is necessary.
Over the years, several different bypasses were publicly presented. Probably, a couple times more remained undisclosed or silently patched. Many are known for years and are still working. Dozens of them have been implemented in the great open-source UACME project hosted on github: https://github.com/hfiref0x/UACME. Project documentation also names authors of corresponding bypasses and keeps track of their status.
Is this the biggest security hole on Windows ever? Not really, as Microsoft clearly states, UAC is not a security boundary. It’s a convenience feature that helps not to shoot in your foot. The blue team should never rely on UAC being any kind of security protection.
All following methods were tested on fully patched Windows 10 Pro: 10.0.18363 @ 2020-04-21.
Most methods belong to one of the following groups:
Instead of trying to automate this attack, we will use it as an example to show how such attack class works. Moreover, this single method will work with any Microsoft Management Console (MMC) based application. The elevation, using azman.msc, goes like this:
azman.msc, the process is auto elevated to High integrity.cmd.exe into the address bar and click Enter.whoami /all that you are now running with the full administrative token.You can see this example on the following video:
Please note, that unless automated, this trick requires interaction with the desktop – if we have such interaction, we can simply agree on UAC prompt, so no UAC bypass here exists.
Yet another GUI based attack consist of just two steps:
msconfig.exe. This process auto-elevates to High integrity.This time, the method has been automated in the UACME project, as method number 55.
Not every technique can be reliably used to perform UAC bypass, though. There is another mechanism that prevents most of them.
UIPI has been introduced in Windows Vista as a solution to the so-called shatter attack. In this attack, a medium integrity process can simply look for processes with higher integrity and send GUI messages to its message-loop. Such a message could emulate any GUI actions, setup callbacks, etc. Obviously, this was a huge security problem, hence UIPI was introduced.
The new isolation added with UIPI blocks sending messages to the process of higher integrity level, so it’s not possible to simply hijack administrator’s cmd.exe and inject custom commands over there.
As you might expect – it’s not a security boundary, either. There is a special case – an application can set a special value (uiAccess) to TRUE in its manifest. In addition, the application needs to be signed by Microsoft, and installed in the secure directory:
This prevents just anybody from crafting custom binaries to use UIPI bypass. Let’s take a look at System32 and check how many such applications we have in the system itself. We will simply grep for a string within embedded manifests:

There are a few worth looking at, especially osk.exe – the on-screen keyboard gives us quite a good primitive to perform GUI attacks. In addition to having uiAccess, it is also an auto-elevated application.
Osk.exe loaded from System32 will load OskSupport.dll library, but if we move it somewhere else (remembering the list of secure directories!), we will have a chance to perform DLL hijack (more on that in the next section) by planting our custom made DLL. This usually requires some misconfiguration or other tricks, though.
What UACME does is, it copies the osk.exe token. It turns out that uiAccess is really just a part of a token, hence you can steal it, fix up the integrity level, and use it to run a new application. The application should be automated to send whatever message you wish to High integrity GUI application. The selected target here is msconfig due to a short path to open new elevated cmd, but this is quite a general method and should work with a number of applications. The details of this are described here.
Let’s dive into another method of token elevation. Unless DLLs are loaded using the full path, a method called DLL Search Order is used to look for the library in predefined locations. This can be observed with Sysinternals’ ProcMon if we filter for “Result equal NAME NOT FOUND”. Sometimes Windows can check several locations before the right one is found and DLL is loaded. Assuming enough privileges to write to those locations, we can plant an arbitrary library and rename it as required. The affected process will load our library, instead of the expected one. The library should probably have DllMain(), the method defined to start a new process or add a new administrator account.
UACME project implements several methods relying on DLL hijacking. Let’s take a look at method number 23, implemented as ucmDismMethod. This method drops crafted library into the user’s Temp directory. In the same directory, it also drops the XML file, called oemsetup.xml, with the following content.
<?xml version="1.0" encoding="utf-8"?>
<unattend xmlns="urn:schemas-microsoft-com:unattend">
<servicing>
<package action="install">
<assemblyIdentity name="Package_1_for_KB929761" version="6.0.1.1" language="neutral" processorArchitecture="x86" publicKeyToken="31bf3856ad364e35"/>
<source location="%configsetroot%\Windows6.0-KB929761-x86.CAB" />
</package>
</servicing>
</unattend>
The dropped library is moved to C:\Windows\system32 by requesting move operation through the COM interface {3AD05575-8857-4850-9277-11B85BDB8E09}. This is an auto-elevated operation, which also is a sort-of UAC bypass (detailed information on COM interfaces will be shared in our next article).
COM request results in another process started as C:\WINDOWS\system32\DllHost.exe /Processid:{3AD05575-8857-4850-9277-11B85BDB8E09}moving planted DismCore.dll from Temp directory to C:\windows\system32. The library is planted in the system directory which is one of the first to check during the DLL searching process.
Finally, UACME starts pkgmgr.exe (auto-elevated Windows binary) with parameter /n pointing to oemsetup.xml file. The full command is: "C:\WINDOWS\system32\pkgmgr.exe" /n:C:\Users\<user>\AppData\Local\Temp\oemsetup.xml
Pkgmgr doesn’t do much before starting High integrity dism.exeusing following command: "C:\WINDOWS\system32\dism.exe" /online /norestart /apply-unattend:"C:\Users\<user>\AppData\Local\Temp\oemsetup.xml"
While dism.exe initializes, the system32 directory is checked prior to C:\windows\system32\dism directory in which real DismCore.dll is located. As a result, the planted library is loaded instead and control over the High integrity process is achieved. Any predefined payload can be run with an administrative token.
Another subset of methods uses various registry keys to interfere with the normal execution of elevated commands. Single UAC bypass exists for two of Windows components: fodhelper.exe and computerdefaults.exe. UACME project implements it as method 33. We can reproduce it by executing the following PowerShell commands (fodhelper.exe can be replaced with computerdefaults.exe):
Standard users always have access to the HKCU part of the registry – it is where personal settings are stored. Affected applications are simply using the WinAPI method, which on their behalf test if alternative shell applications weren’t defined.

Since entry is found, it is being executed instead of normal execution flow.
Previously mentioned COM interfaces can be considered a standalone group of methods. The registry key Computer\HKEY_LOCAL_MACHINE\SOFTWARE\Microsoft\Windows NT\CurrentVersion\UAC\COMAutoApprovalListcontains a list of COM interfaces that can be elevated. The process is slightly more complicated, but as long as certain requirements are met, we can call the specific COM class and elevate (because current token, even though filtered, belongs to the administrative user).
The UACME project implements method 41/ucmCMLuaUtilShellExecMethod, which uses CMSTPLUA COM interface {3E5FC7F9-9A51-4367-9063-A120244FBEC7}. We can peek into the interface definition using OleView .NET application.
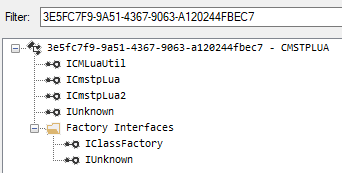
From there, we are interested in ICMLuaUtil, which implements the ShellExec method (here listed as Proc9):
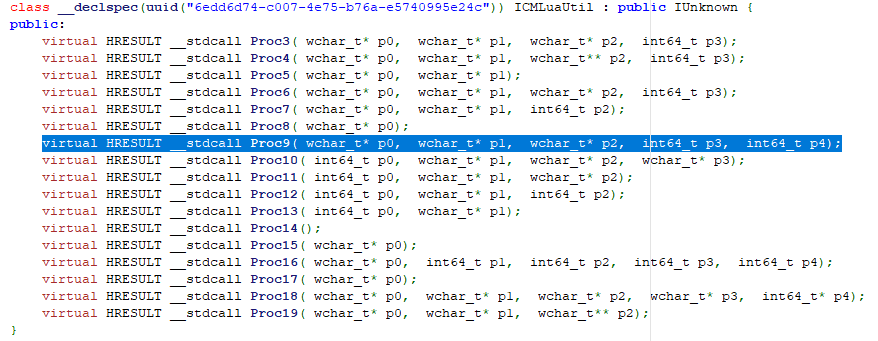
Once everything is set up, ShellExec method is called with arbitrary command as an argument. Because the parent host (DllHost, started with /Processid:{3E5FC7F9-9A51-4367-9063-A120244FBEC7} argument) already runs as High integrity process, the new command is also started as such, and results in UAC bypass.
Using “User Account Control Settings”, it is possible to reconfigure when UAC prompts appear. The administrator can choose to be always notified even if Windows settings are changed. This essentially stops most of the bypasses, but not all of them.
Windows comes with a number of predefined scheduled tasks. Each task has certain triggers, actions, and the associated contexts in which it is running. For instance, SilentCleanup task, defined in Microsoft\Windows\DiskCleanup has the following actions defined:
![]()
It turns out, that we can overwrite windir variable, used within the path, by writing to HKEY_CURRENT_USER\Environment in the registry. Then, we can interactively trigger this task. Because we control windir variable, we can inject arbitrary command instead. The following code snippet shows how to start a newly elevated cmd.exe window.
The mitigation for most of the described methods is quite simple. Reconfigure UAC settings to the highest level – “Always notify me when …”. Some bypasses will still work, though.
As a next step, how about limiting the usage of administrative accounts? Windows’ permission system is flexible enough to grant only necessary privileges to an account without giving it full administrative access. Think carefully what set of permission you need to assign to a given role and remember about the last set of privileges rule. If administrative account is not used – there is no chance for UAC bypass.
As per auditing, it is worth to observe known registry entries or DLL paths used in UAC bypass methods. This will help to detect attacks even if the given method is patched or mitigated in the current configuration. To start working on auditing, follow mitre article.
Learn more ways to cheat on Windows to make your organization more secure. Take short but intense training from CQURE CyberBytes series.
UAC is quite useful when it comes to preventing accidental system destruction (e.g. removing core system components). At the same time, it doesn’t prevent from getting administrative rights back, and shouldn’t be considered a security boundary at all.
There are numerous methods that pentesters can use to bypass UAC, without having access to the graphical user interface – some of them are really based on core Windows functionality. It is safe to assume, that they will never be “fixed” by Microsoft. Instead, to properly mitigate the risks, one should better plan which accounts for what privileges should be used to run services and applications.
And if you want to stay up to date with CQURE Academy’s news, sign up for our NEWSLETTER!

Adrian Denkiewicz, Cybersecurity Specialist at CQURE, Ethical Hacker, Penetration Tester, Red Teamer, Software Developer, and Trainer. Holder of OSCE, OSCP, OSWP, and CRTE certificates. Adrian is deeply interested in the offensive side of security, ranging from modern web attacks, through operating system internals, to low level exploit development. Passionate about learning a bit of everything, but mostly things related to astronomy and rocket science – Adrian has even completed an online rocket science course!
Twitter: @a_denkiewicz


Do you want to receive the geekiest cybersecurity solutions, tools, and tricks, straight to your inbox?
Learn more about our offer in terms of Consulting. Our Cybersecurity Experts perform consulting work on a daily basis, hence we are fully prepared for any challenge.
Learn more about our offer in terms of Consulting. Our Cybersecurity Experts perform consulting work on a daily basis, hence we are fully prepared for any challenge.
Lorem ipsum dolor sit amet, consectetur adipiscing elit. Ut elit tellus, luctus nec ullamcorper mattis, pulvinar dapibus leo.